
Simulation Domain
The Fluid Flux simulation implementation is based on shallow water equations. The shallow water equations are a set of mathematical equations that describe water flow in shallow areas, such as rivers and streams. They are commonly used in hydrodynamic modeling to simulate the movement of water and predict its behavior under various conditions. The resulting simulation will show the movement of the water and the formation of ripples and waves on the surface. You can adjust the initial conditions and parameters of the simulation to see how they affect the movement of the water and the formation of ripples. Remember that the shallow water equations are a simplified water flow model, and they may not always accurately reflect the behavior of actual water.
The BP_FluxSimulationDomain blueprint is the heart of the Fluid Flux system. This blueprint is responsible for handling important tasks like:
- Generating the ground height map for the texture (using
FluxHeightmapComponent) - Updating the simulation of shallow water fluid, foam, and wetness.
- Baking and exporting the simulation state.
- Sending data to the fluid surface renderer.
The Shallow Water simulation is based on the assumption of linear vertical pressure profiles, and therefore, it is simulated in two dimensions. In general, the algorithm can be described in a few steps:
- Simulation data is stored on 2D render targets.
Ground map – information about the landscape and obstacles
Velocity (RG) Depth(B) Foam(A) map – stores information about fluid
Height(R) Wetness(G) map – stores surface height and wetness of the surface - The slope of the ground height field and the slope of the fluid are combined and used to calculate the pressure and velocity.
- Simulation is an iterative process of updating fluid height and velocity.
- The result of integration is used for foam and velocity advection.
- Fluid modifiers are used as input for the simulation to change the current state.
- The simulation frame accumulates fluid wetness and generates the fluid surface mesh displacement.
The BP_FluxSimulationDomain actor placed on the map does nothing because it’s empty and needs to be filled with fluid. The simplest way to fill containers with fluid is by using a Modifier source actor.
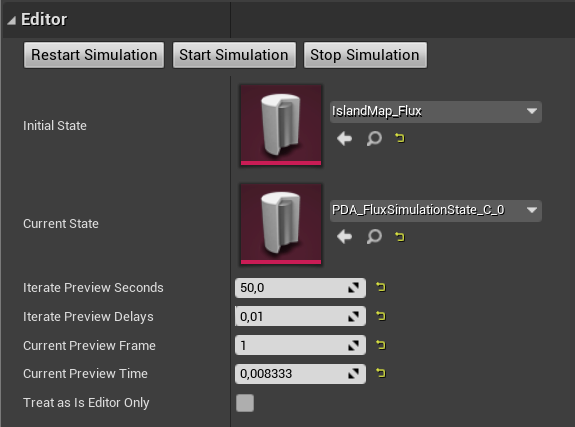
The BP_FluxSimulationDomain blueprint has a straightforward editor that simulates the fluid’s state on the map in the editor mode. Simulation can be prepared in the editor, baked to a state, or dynamically updated by the simulation blueprint.
Modifier Component
A modifier component is a powerful tool that changes the current simulation state. It’s the simplest way to interact with the simulation. Modifiers can be used for:
- Adding/removing fluid in the simulation domain.
- Changing the velocity and flow direction of the fluid
- Simulating custom interaction with fluid
- Generating waves
The tutorial below presents how to add a source modifier to the scene and fill the simulation domain with fluid:
Fluid Flux contains predefined modifiers:
BP_FluxModifierComponent– Base parent class for all fluid modifiers. Every modifier component extends it and implements specific behavior. Users can create custom modifier classes and materials for specific use cases, such as whirlpools/waves. Describing the architecture is outside the scope of documentation. TheBP_FluxModifierSourceComponentcomponent is an excellent example of a modifier that can be used as a starting point for learning how the system is designed.BP_FluxModifierSourceComponent– Simple modifier that allows adding/removing fluid and changing velocity in a specific area.Parameters Description Volume The quantity of fluid applied by the modifier (depending on the Mode). Velocity The velocity of fluid applied by the modifier (depending on Mode). Shape The shape of the fluid modifier Mode Defines how the modifier is applied to the simulation. All modifiers are rendered to a simulation buffer. Mode is a method of blending used during this process.
Add – This mode will add the ‘volume’ of fluid and its velocity to the current fluid on the map.
Adjust – adjusting the current state of fluid to the height of the modifier.
Set – will set the constant height of fluid in the area.Edge The softness/hardness of the modifier edge. Useful for soft mixing with fluid or for uniform filling of the vessel. Intensity Scale the modifier’s effect on the domain (0.0, 1.0>. Duration How long the fluid source remains active: less than 0 – infinite; 0 – applied in a single frame, then the modifier is disabled; more than 0 – duration in seconds. SortPriority Affects the order of modifiers in the queue. It may be helpful when the user needs to fill the domain and then remove some fluid. A value larger than 1000 forces the system to append without sorting. AutoActivate The modifier can be inactive initially and activated by an event from gameplay or a sequencer.
There are many ways to remove fluid in the simulation domain. It depends on the mode you choose:
Mode= Set, Volume=0 – will set 0 water in the area of the modifier
Mode= Adjust, Actor.Z position – lock fluid at a specific height
Mode= Add, Volume negative – slowly removes fluid
BP_FluxModifierWaveComponent– Generates waves/fluid on the borders of the simulation domain. More info and use cases can be found in the chapters related to ocean configuration.BP_FluxModifierForceComponent– Generates forces when the actor moves (based on the velocity). It can be added to the character.
Modifier Container
The modifier container is a particular type of actor that can store multiple modifiers and send them to the simulation. If the actor implements the BPI_FluxModifierContainer interface, it’s considered a modifier container.
BPI_FluxModifierContainer interface can be implemented by any actor. A good example is BP_DemoCharacter that uses BP_FluxModifierForceComponent to interact with a fluid. Only the AddModifiers function needs to be implemented to make it work.
BP_FluxModifierContainerActor is a primary container that combines multiple modifier components into a single actor, allowing them to work simultaneously.
BP_FluxModifierSourceActor is a specific type of container actor that simplifies the process of adding simple source modifiers to the scene.
Every modifier is rendered in an additional render target pass, so it’s not cheap. Minimizing the number of fluid modifiers within the simulation is a good practice for achieving the highest performance.
Solving issues
Unexpected spikes sometimes destroy the simulation. Shallow water simulation can exhibit unpredictable behavior due to the loss of stability when encountering steep slopes. This is a widely recognized problem that can be resolved by fine-tuning specific parameters and enhancing the reliability of the simulation.
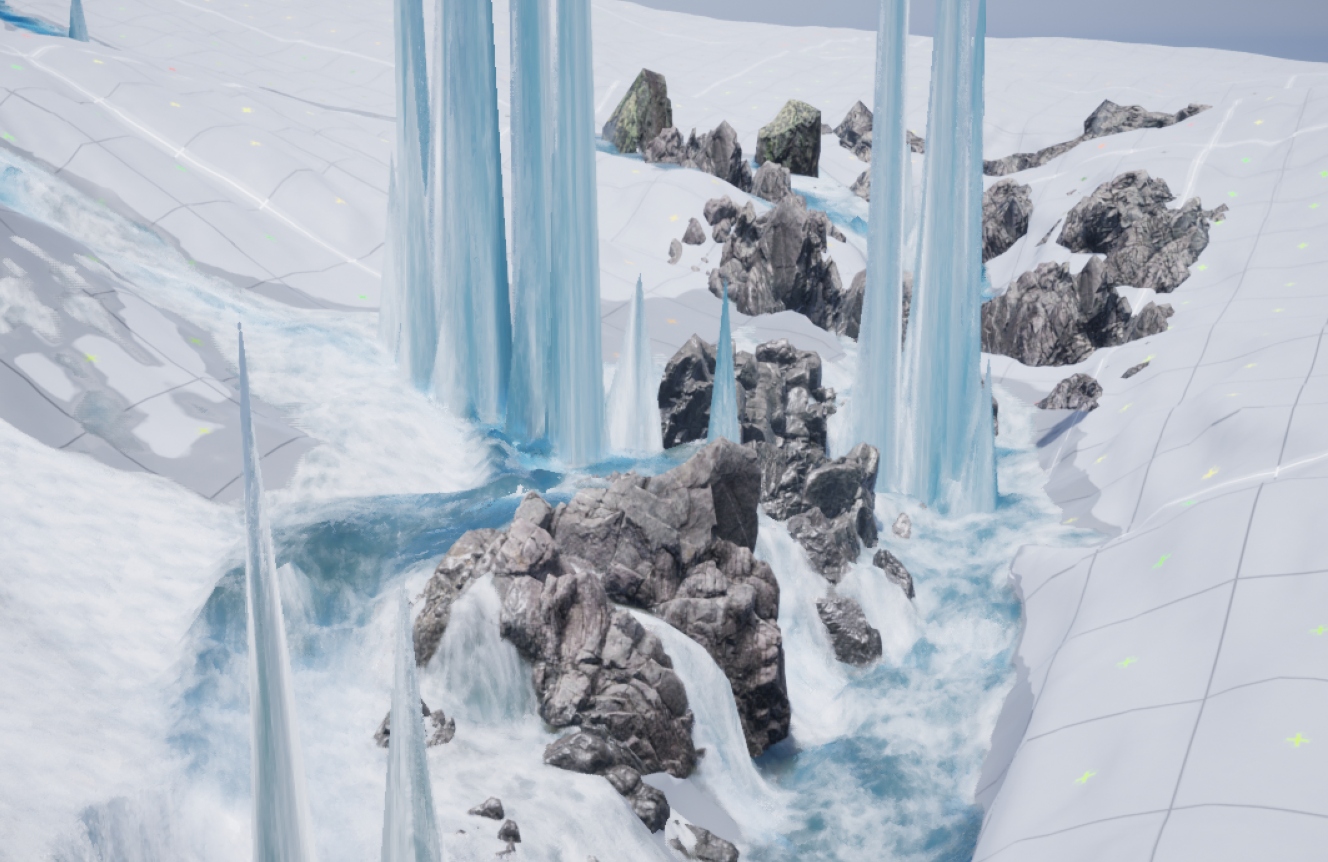
Simulation spikes are caused by the instability of simulation in some conditions.
- Area World Slope (Increase)
Increasing this parameter will scale the scene’s height on the Z-axis, making your fluid move slower on slopes. It replaces the deprecated Slope Scale parameter. - OvershootingBlend (increase), OvershootingEdge (decrease) – fix overshooting by smoothing.
- Simulation Delta Time (Decrease)
Fluid Flux updates with a constant delta time. That means the time that elapsed between two game frames is divided by delta time, and the result is the number of iterations. Generally, more iterations result in lower performance. By default, the Simulation Delta Time attribute is set to 0.2. Although it is not entirely accurate, it can achieve the highest performance. - Debug Preview / Debug Hidden In-Game (Debug)
Pay attention to the ground debug preview. If you spot some red spikes where the simulation does not work correctly, your ground texture and geometry should probably be adjusted. - Tweaking other variables, such as velocity limit, acceleration limit, fluid transport limit, friction, damping, gravity, and even world pixel scale, can make a difference.
I am still experimenting with different solutions for this spike problem and trying to figure out some method to force stability even in bad conditions. You can expect multiple improvements in future updates.
Fluid state
The PDA_FluxSimulationState is a unique data asset specifically designed to store the current frame of the simulation. The simulation state is the most essential structure in the system.
The simulation actor dynamically updates simulation states. A dynamic simulation state is automatically created in the constructor script and stored in BP_FluxSimulationDomain.CurrentState. Data can be easily previewed and used for rendering and further fluid analysis.
The simulation state can be exported to the data asset and used later in many ways.
- It can be loaded at runtime
- It can be used as a starting point for the simulation
- It can provide data rendered by the surface actor
- It can be used in other gameplay tools, in Niagara emitters and materials
Exporting State
BP_FluxSimulationDomain.CurrentState can be baked to an asset by right-clicking BP_FluxSimulationDomain and choosing Scripted Actions -> Flux Export Simulation. The short tutorial below presents the process of generating and exporting the fluid state to a data asset:
(0:07) Prepare data assets that will store the state
(0:20) Start the simulation of fluid on your map and stop when it’s ready
(0:50) Choose
SimulationDomain→ Context Menu → Scripted Actions →FluxExportSimulation(0:54) Select the newly created state as a target and adjust settings.
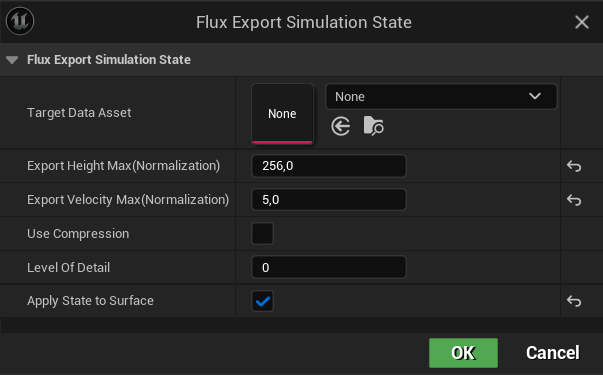
Parameter Description ExportHeightMax ExportVelocityMax ExportHeightMax and ExportVelocityMax can improve quality. When the velocity or height in the exported simulation is very small, it is worth scaling the precision to use the whole range of bytes when storing the data. The exporter should do this automatically when opening the script. However, analyzing the entire simulation may require many computations and additional implementation, so I decided to leave it for manual adjustments. UseCompression Exporting compressed assets. It can save some memory, but also affects the quality of the surface. Level Of Detail Scales down the simulation resolution Apply State to Surface Applies exported data to the surface, which allows previewing the results.
After those actions, you should see the generated state and additional textures.
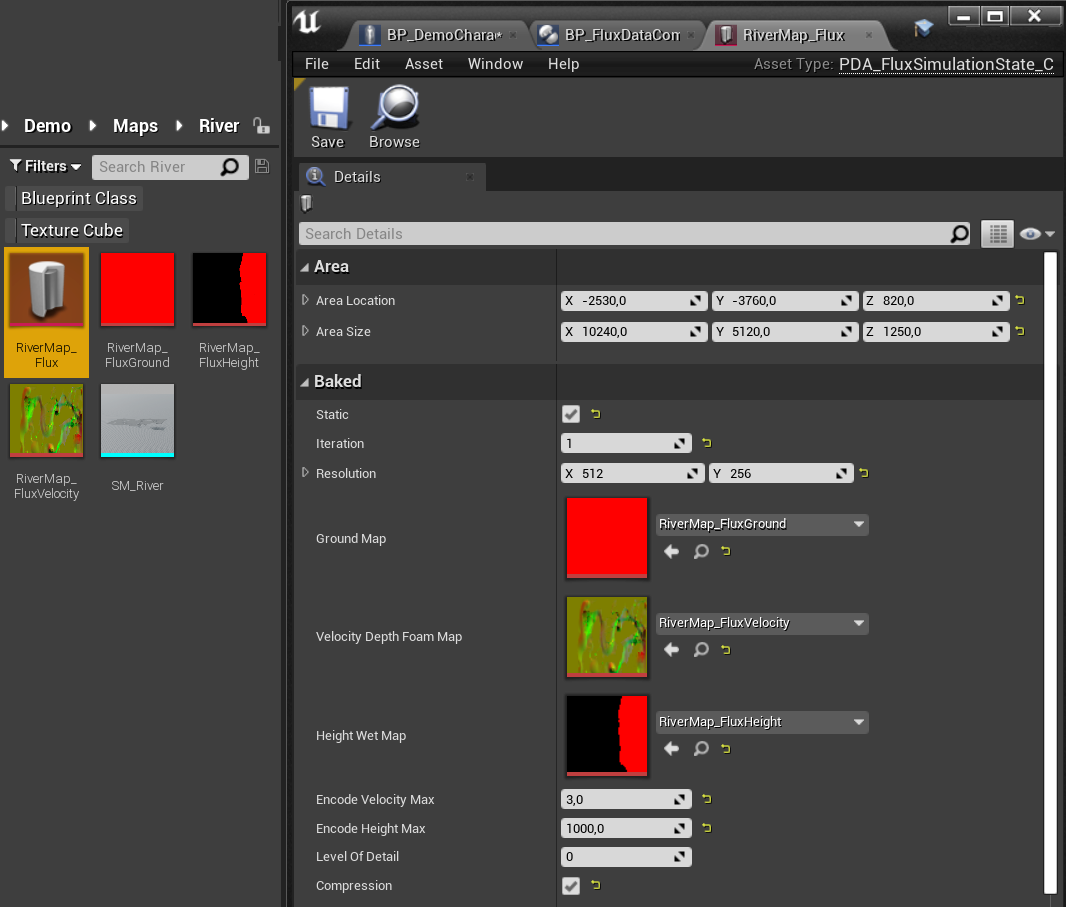
Example river state and baked textures.
Pay attention to simulation resolution! The “Power of Two” rule is a fundamental necessity due to the way game engines work. You will not be able to export the simulation state if its size is not a power of two (128, 256, 512, 1024, etc.).
Use case 1: Initial state
Using the state as the initial state of simulation allows us to start the simulation from a specific frame. It means that a simulation of flowing water does not have to be generated every time the game starts – it can start from the saved frame.
- Select SimulationDomain
- Find InitialState attribute
- Set the state exported before
From now on, the simulation starts from the data stored in the state.
Use case 2: Loading state in gameplay
Sometimes, there is a need to load a state during gameplay in blueprints, like a checkpoint. Simulation->LoadInitialState function can be used to handle these tasks. An example is presented in the screenshot below:
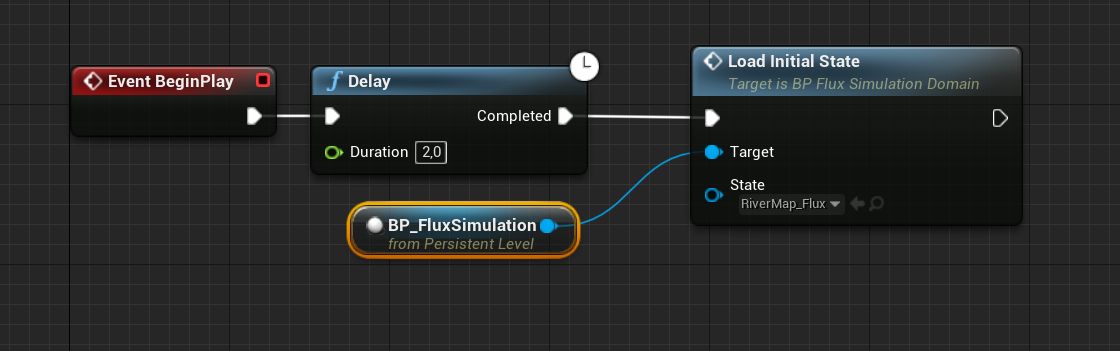
River State loaded 10s after beginning play of the level.
Use case 3: Using state without simulation
If you are not planning to update the simulation dynamically, then a better option is to remove or disable the SimulationDomain actor and use SimulationState directly in the FluxSurface. This solution may be significantly faster and more reliable, and it can also save memory. Use this configuration:
- Configure SimulationDomain and run the simulation.
- Click the right mouse button on SimulationDomain and export it to the State Data Asset.
- Set SimulationDomain->AffectWorld = false
- Set Surface->SimulationState directly using the exported asset.
When BP_FluxSimulationDomain.SurfaceActorReference is set, the actors communicate with each other, and the state is automatically passed to BP_FluxSurface.SimulationState, but changing AffectWorld to false disables this connection.
You can remove SimulationDomain or set IsEditorOnlyActor = true to avoid spawning it in the final build and wasting memory.
Dynamic ground
Fluid Flux uses a static ground map for simulating fluids, but updates are allowed occasionally. It is costly, so it is not recommended to use this operation in every frame:
The BP_BreakableDam presented in the video can be destroyed when the player triggers it. It is an excellent example of updating the ground after the dynamic object has moved. Look at the Break function, which is the heart of the dam system.
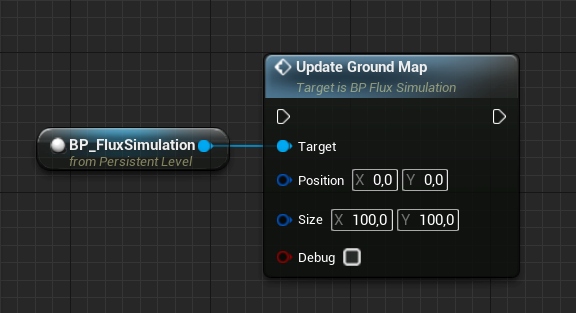
It evaluates UpdateGroundMap on a simulation actor, which takes the object’s position and size that will disappear to recreate the ground in this area. You can do the same operation when adding something on your level.
Mesh generator
The static mesh mode is the most efficient way to render Fluid Flux water surfaces. In Fluid Flux 3.0, the mesh generator was rewritten to a new, separate editor actor tool called BP_FluxSurfaceMeshGenerator.
The new tool uses the Geometry Script plugin introduced in Unreal Engine 5, so don’t forget to enable it in your projects!
Features of the mesh generator
- This new tool is now separated from the
BP_FluxSurfaceactor, making the interface cleaner and more encapsulated. - The new wireframe preview option dramatically improves exported mesh visualization.
- Baker optimizes mesh density using fast, built-in engine geometry scripts, ensuring more evenly distributed geometry.
- Performance issues related to reading render targets have been addressed, and the entire generation process is now working over 50 times faster.
- The new static mesh generator provides more precise results and supports bigger meshes, thanks to shorter generation time.
- Exporting is simpler, as the target mesh can be pinned to the blueprint and overridden whenever it changes.
The video below presents the optimized output mesh generated in the editor with wireframe preview enabled, which can be found in the Demo/Maps/FluxRiverStaticMeshMap:
Limitations
Unfortunately, there are still some limitations:
- Geometry Scripts work only in the editor, so generating static meshes at runtime is no longer supported.
- Generating huge meshes may take some time, as the system is partially implemented in blueprints.
- The generator works only for rivers and lakes. Building a static mesh for the ocean makes no sense, since the ocean should be dynamic.
- The output mesh can’t be blended with the ocean because it uses another surface rendering mode.
- If the mesh is too dense, generation may not execute, as it may exceed the available iteration count in blueprints. You can fix this by increasing the Maximum Loop Iterations parameter in Project Settings.
Generator tabs
All generator attributes are organized in separate tabs designed for specific tasks:
- Exporter – saving data and configuration of the target mesh that will be exported, file name generation, etc.
- Source – Source of data for generation. The system can read data from the Simulation Domain, Surface Actor, or Simulation Data Asset.
- Generator – Parameters for processing mesh generation and mesh simplification.
- Preview – The way the mesh is displayed to the user. Preview mode is crucial:
PreviewEditor_GeneratorMesh – generated preview of the mesh that can be adjusted.
PreviewActor_DataAsset – original data asset rendering.
PreviewActor_StaticMesh – final generated mesh on surface.
Generating mesh
In the tutorial below, we will walk through a workflow for generating static meshes based on the simulation’s baked state.
- Use a simulation domain to generate water. (previous chapters)
- Export simulated state to Simulation Data Asset (previous chapters)
- Switch the surface to static mode (
SimulationDomain.AffectWorld= false,SurfaceActor->SimulationState= exported state). - Add
BP_FluxSurfaceMeshGeneratoron the level. - Set the
SurfaceMeshGenerator.SourceActor=Level.Surface(it provides data for generation)
Alternatively, you can set the SourceDataAsset = exported data asset. - Set the
SurfaceMeshGenerator.PreviewActor=Level.Surface(it will display the data) - Set previewMode = PreviewEditor_GeneratorMesh. This option renders the mesh directly in the editor. It can’t be used at runtime.
- In the Exporter options, set the Target Static Mesh or generate a new one when it’s undefined.
- Click “Save to Mesh Asset” to export the mesh.
- When
SurfaceMeshGenerator.TargetStaticMeshis set, you can switch the preview option to PreviewActor_StaticMesh to see the exported mesh in the game.
The BP_FluxSurface actor renders static meshes using the special mode SurfaceMeshMode=Domain_GeneratedMesh, which is automatically set by the generator.
The example preview material “MI_River_SurfaceOverStatic” is designed for static meshes and can handle fluid data such as foam and velocity encoded in vertex color. The material is set to the mode Material.UseSimulation = false, which means the system will read the data from the vertex information instead of sampling textures.
Surface PreviewActor_StaticMesh uses SurfaceOverBakedMaterial for rendering geometry.
Below you can watch a short video presenting the process of using the BP_FluxSurfaceMeshGenerator on a preconfigured Surface with exported data state:
Recreating Ocean
Creating an ocean scene is a complex topic that involves coordinating multiple actors simultaneously. It is beneficial to review other tutorials before beginning to recreate the ocean scene. Examples of ocean setup are presented in the demo maps FluxIslandMap and FluxBeachMap. You can copy this setup (SurfaceActor, SimulationDomain, WaveTexture, WaveModifier) or create it from scratch on your map using the description from this chapter:
Configuration step by step
- Start with an empty map with some island, landscape or ground meshes.
- Add actors:
- Add
BP_FluxSimulationDomainactor. Responsible for simulating water. - Add
BP_FluxSurface_Oceanactor. Responsible for rendering. - Add
BP_FluxOceanWaveactor. Responsible for ocean waves outside the simulation. - Add
BP_FluxModifierWaveActoractor. Responsible for generating waves in the simulation.
- Add
- Select
BP_FluxSurface_Oceanactor- Set
Surface->SurfaceMeshMode= InfiniteGrid_128_Niagara. It will force rendering of an infinite mesh (a feature added in version 2.0). - Set
Surface->OceanWaveActor=FluxOceanWave. This action will facilitate the reading of data from the ocean wave actor.
- Set
- Select
BP_FluxOceanWave– the dedicated actor that provides ocean waves. Implementation is much simpler than the classical analytical approaches, such as Gerstner or FFT. The system uses an animated 3D texture (VT_OceanWave) generated in Blender.- Adjust the Z position of the ocean wave actor.
- Adjust the wavelength and wave height to your needs.
- Select
BP_FluxModifierWaveActoractor- Adjust the transform of ModifierWave to cover the edges of the simulation that should generate waves. Change position and size if needed.
- Select
BP_FluxSimulationDomainactor- Switch the simulation domain surface to force rendering a new surface
Simulation->SurfaceActorReference=BP_FluxSurface_Ocean - Change the blending of the simulation with the waves outside the simulation using the
Simulation->Domain->AreaWorldBlend=(0.1, 0.1, 0.1, 0.1). You can adjust it to your needs. Custom blending between oceanic waves outside the simulation may be necessary in special cases, such as when dealing with a one-sided ocean. This can be achieved by configuring the AreaWorldBlend attribute within the SimulationDomain actor. - Adjust the Z position of the simulation actor.
- Adjust the XY location, resolution, WorldPixelSize, and size to cover the area where the shallow water simulation should be generated.
- Ensure the ground map is captured correctly by checking if the debug grid represents your scene. (For more info, check the ground capture-related chapters)
- Switch the simulation domain surface to force rendering a new surface
- Test the simulation. Click
SimulationDomain->StartSimulationor run the game.
Sequencer
Sequencer allows users to create in-game cinematics through its specialized multi-track editor. Unreal Engine has many options that can be used for previewing scenes, but Fluid Flux does not support some of them:
- Real-time – You can preview the simulation by hitting “play” (green button) in the editor. It will show you how it would behave in real-time.
- Editor – Clicking “Start Simulation” in
BP_FluxSimulationactor on the scene (as presented in tutorials) allows you to generate a specific frame and save it to the state (an initial state that can be pinned to the simulation actor as the first frame). - Sequencer editor – Simulation can’t be previewed in the sequencer because the Fluid Flux system does not allow rewinding simulation in the current version, and the sequencer affects actors – the topic is very complicated.
- Capture Movie – Sequencer Render Movie to Video. It works in real-time mode, and Fluid Flux water will render correctly in the final video.
- Capture 360 – This option was never tested.
If you want to preview the simulation with a sequencer, then this setup may be helpful for you:
- Drag and drop the sequencer on your map.
- Enable the AutoPlay option in LevelSequenceActor.
- Press “Play in selected viewport” or “Simulate.”
Fluid Flux provides an option to use modifier activation/deactivation functions from a sequencer. The process of using this functionality is simple:
Add a Level Sequence to the level and set Autoplay = true.
Add a Source modifier to the level and set Duration = -1, AutoActivate = false.
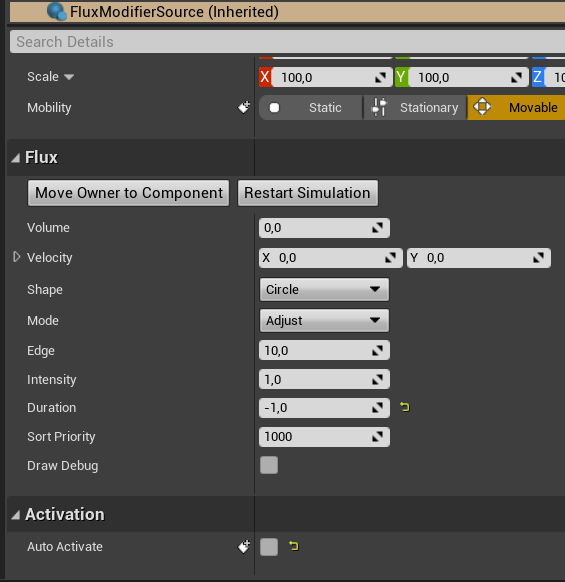
Drag and drop the Source modifier to the sequencer.
Add
Track->FluxModifierSourceChoose the moment of activation on the timeline and click “Add a new key,” then change the event’s properties as presented on the screen below. You can choose the Activate/Deactivate function.
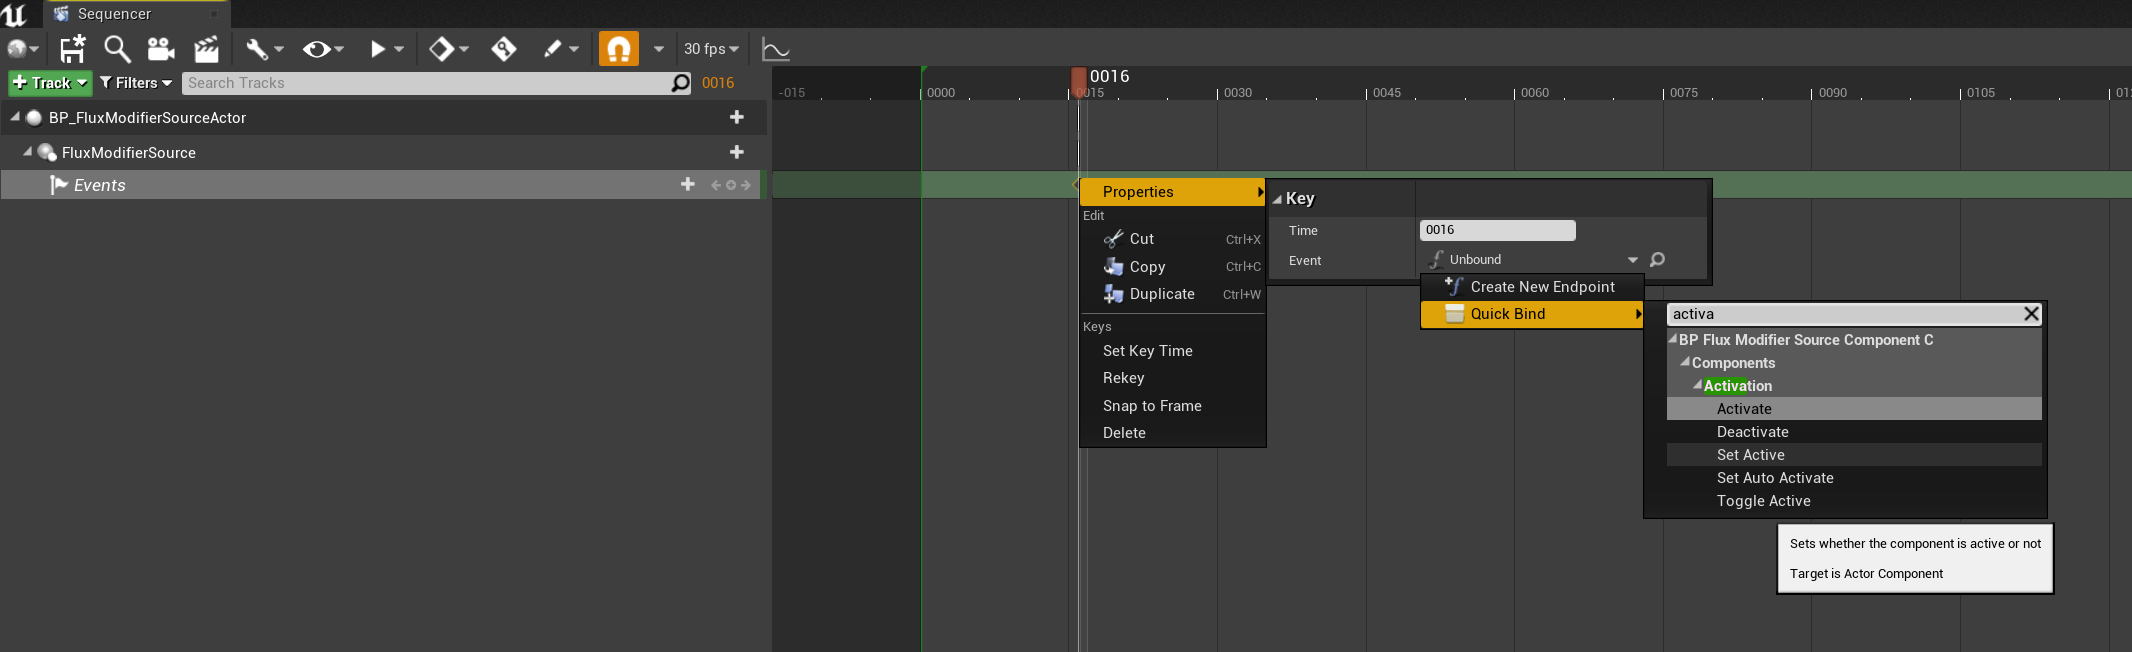
Now, you can test the scene by rendering a video or playing the game. The modifier should be activated automatically by the Sequencer event.